When you buy a Windows 10 device, you have the Windows 10 Calendar app already installed on it. In fact, it is one app in the bundle of Mail, Calendar and People apps. These three apps appear as one app, the Mail, when you launch the Mail app. In other words, these apps are integrated together as one app.
Microsoft’s Windows 10 Mail and Calendar apps help you to stay up to date on your email, manage your schedule and stay in touch with the people you care the most. These apps help you communicate quickly and focus on important matters across your accounts. They have been designed for both home and work.
You can use these apps to be most productive at your home and work. However, you will have to do some set up before you start using them.
Since the Calendar associates itself with your email accounts that you have set up with the Mail app, I have mentioned the Mail too while talking about the Calendar. However, my focus in this post is on Windows 10 Calendar. So, to get ahead, I will explain how to access, set up and use Calendar app on my Windows 10 Laptop PC in the following paragraphs.
Page Contents …
Accessing Windows 10 Calendar App
To be able to use the Calendar app, you will have to set it up. However, you will have to access the app first to be able to set it up. Follow the steps below to access the Calendar app.

- Click or tap the Start menu icon, the Windows icon, on the lower left corner as in Figure 1 above if you are not already running the Mail app
- Then click or tap Mail on the menu that pops up on the left or on the Tiles menu on the right. Alternatively, on the left Menu, the Windows 7 like menu, you can click or tap the Calendar icon without looking for Mail icon. Please refer to these two menus in the picture above
Accessing Windows 10 Calendar App Continues With A Flavour Of The Calendars I Have Added To It
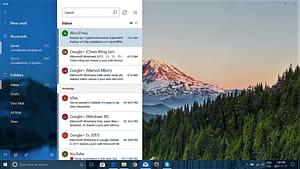
- When you click or tap Mail on either of the 2 menus, the Mail pane – a window – pops up. Look at the blue coloured column on the left side in Figure 2 below. This is the Mail pane with my Gmail and Yahoo accounts added to it. Both of these accounts have my calendars that I have set up with them
The Calendar has various views – the day, week, month and year. Follow the steps below to access them.
- Glance at the bottom on the left side of the Mail pane. The Mail, an envelop icon, is highlighted. On the right side of it are the Calendar and People apps icons
- Hover over the Calendar icon. A “Switch to calendar” tooltip displays. Click or tap the icon
- You get to the Month View of Calendar as in Figure 3 below. This is the calendar for the Month of Nov, 2017 starting with the current week and ending after the 5th week which falls in the following month. I am referring here to the calendar on the white background and not the calendar on the blue background as the calendar on the blue background displays date range for 6 weeks
- The calendar has various views. You can see Today‘s calendar and the calendars for the Day, Week, Month and the Year by clicking or tapping the respective button

Also, you can access the Calendar app directly without following the Mail app’s route as mentioned above. To do so, you need to click or tap the Calendar menu item on the Tiles menu on the right side as In Figure 1.
Setting Up And Using Calendar
When you launch the Calendar app the first time, you may find double or triple entries of the same item on it. It might have happened because you have added multiple accounts into Windows Mail app or the Calendar app or both of them. In that case, any appointment that appears in the calendars of both accounts displays as two entries in the Windows 10 Calendar. That could happen if you have duplicate entries in the same account as well.
Removing Duplicate Entries From The Calendar
However, there is a way to get rid of these duplicate entries. To achieve that you will have to reorganise your Calendar. So, how would you reorganise your calendar to remove duplicate entries? I am explaining that with an example. Let us assume that I have turned on Canadian Holidays calendar in my two accounts one each in Gmail and Yahoo! These will show as two Canadian Holidays calendars in the Windows 10 calendar. Just turn off one of those calendars and get rid of the clutter. Stay at the peak of your productivity by keeping your calendar, the productivity app provided by Windows 10, clean and clutter free.
Setting Different Colours For Different Calendars
To distinguish between calendars you can set different colours for each of them.
In my Gmail account Calendar, I have set up alternate Fridays as my Pay Day. Accordingly Nov 10 and 24 are displaying as Pay Day on green background as in Figure 3 above. You change this background colour to the colour of my choice. Also, Nov 24 shows Guru Teg Bahadur’s Martyrdom Day as I have set up Indian Holidays calendar in Gmail. I have set up the font’s colour in which the calendar entries for Indian Holidays would be displayed.
Adding Events To Windows 10 Calendar
Look at 3 horizontal lines below Calendar in Calendar Pane, the second window pane from right, in Figure 3 above. This set of 3 lines is the menu icon for your calendar. For example, the menu items of my calendar in Figure 3 include, from top to bottom, + New event, a calendar of Nov, 2017 starting at current week and ending after 6th week, Microsoft account, Gmail and Yahoo accounts that I have added to Mail and the associated calendars. Below these entries falls the icon of + Add calendars. At the bottom, in a horizontal line the icons for Mail, Calendar, People and Settings find their place.
To add an event to your calendar, click or tap + New event. Doing so displays the Calendar windows as in Figure 4 below.

How I Added An Event To My Calendar
I added an event “Skype call to Hiralal” in Event name. There are other fields – the location, Stat and End date and time, the Event description- that you can fill in with relevant information. I added a location name and a short description in their respective fields in Figure 4 above. Also, I entered the Start and end time of the call which are 10:30 AM and 11:00 AM. Windows issued me a notification as you see in the bottom right corner.

This is a reminder from Windows to me to make Skype call to Hiralal in Meerut between 10:30 AM and 11:00 AM.

There is another way to add event to a calendar. You can click or tap on any date on the calendar and add an event. The events are not for ever. So, you may need to edit or delete them. How do you edit an event? To answer this question, I will say click or tap the event on the calendar. Doing so opens the Calendar window where you can edit the occurrence or series of that event. In fact, you can edit or add details of the events in two fields – the Details and the Repeat. Refer to Figure 6 above. You can delete the event by deleting the name and other information pertaining to the event.
Adding Calendars To Windows 10 Calendar App
To add a new calendar to Windows 10 Calendar App follow these steps
- Click or tap the Add calendars icon, a small rectangle with + sign on its lower right corner. An Add calendars window, as in Figure 7 below opens
- In this window you can select the Holiday calendars for the country of your choice. The calendar you selected will be added to the Holiday calendars in the Calendar menu. I added the Holiday calendars of Canada and United Kingdom as in Figure 7 below

- You can also add calendars by adding accounts to Mail. The calendars associated with those accounts will be added to Holiday calendars. For example, the holiday calendar of India finds its place in Holiday calendars from my Gmail account that I added to Mail app
Removing A Calendar From Windows 10 Calendar App
At times you may find that you don’t need a calendar that you have added to your windows 10 calendar. So, you may want to remove that calendar. It’s very easy to do that. Follow these steps

- Click or tap the downward pointing arrow in front of the calendar under Holiday calendars
- A pallet of colours pops up with 9 colour squares. You are not concerned with these colours here as these are used to set a colour for your calendar entries. Look at the Remove calendar text at the bottom of the pallet
- Click or tap Remove calendar

- Windows seeks a confirmation from you if you really want to remove the calendar and not doing that accidently. The Windows wants your answer to the question – Remove calendar? You can click or tap Continue if you want to proceed further with removing the calendar. Otherwise click or tap Cancel. Hey, don’t click or tap accidently. Use this Windows 10 Feature carefully so that you don’t put yourself into an embarrassing situation
- If you clicked or tapped Continue the calendar will be removed windows 10 calendar
However, you can’t remove a calendar that associates itself with an email account added to Windows 10 Calendar App. To do so you will have to change the relevant entries in the email account.