Personalizing the right side of Win 10 Start menu means making changes to it so that it looks the way you want it. The Start menu as a whole is flexible enough to allow you to customize it. This feature of customizability of the menu allows you to modify the right side of Start menu.
Mentioned below are the features that you can manipulate to make the Start menu your own.
- The Size of Start Menu tiles
- The Tiles on the Start Menu
- The Organization of Tiles on the Start Menu
By changing the above features you can personalize only the right side of the menu. Thus, the menu as a whole is not personalized for you. So, you need to be personalizing left side of the menu as well for having your Windows 10 Start fully personalized for you.
Page Contents ...
Personalizing the Right Side of Win 10 Start Menu
The tiles menu appears on the right when you click or tap the Start icon, the Windows logo, on the lower left side of your device’s screen.
You may want to personalize this menu by making it appear the way you want. That means you can make some changes in the menu tiles in terms of what appears and what doesn’t appear in the menu.
Also, you can resize the menu, change the size of individual tile and add or delete tiles to and from the menu.
Resizing Right Side Of Win 10 Start Menu

Resizing involves changing the height and width of the right side of Start menu.
To make your Win 10 Start menu look less taller than it is, hover your mouse cursor on the top edge of the Start screen, as shown in Figure 1, and slide it down. On the touch screen, tap and drag the upper edge down with your finger.

The height of the screen decreases, but the heights and widths of individual tiles do not change. The Win 10 Start menu has a 3 tile column width which doesn’t change too. There is no way, in fact, to change the column width even if you want to do so purposefully. As a result less tiles show up on the screen. Figure 2(a) above shows a resized, lowered height, Start menu.

Similarly, to make the Win 10 Start menu wider than it is, hover your mouse cursor over the right edge of the Start screen and drag it to right. If you are working on touch screen, tap and drag the edge to the right. The Tiles screen menu becomes wider. More than 1 columns appear on the Start menu as shown in Figure 2(b) above. In fact, a group of tiles spreads away and moves to the right to form a new column. In this Figure, the group of tiles arranged in windows defender group moved from its place in the column to the right and formed a new tiles column.
Manipulating Individual Tiles on Win 10 Start Menu

Figure 2(c) shows 4 sizes of tiles – Small, Medium, Wide and Large. Look at the Life at a glance group in the tiles column.. There are tiles of all sizes in this group. The smallest tile showing Ottawa’s temperature is the Small tile. The bigger 3 tiles with the same sizes are the Medium tiles. The top right and bottom left tiles in this group are the Wide tiles. Phone Companion is the Large tile of Life at a glance group. To get the name of an app a tile represents, hover the cursor over it or tap it. The app’s name will be displayed on the tile. However, all the tiles do not display apps’ names.
What You Can Change In The Start Menu Tiles
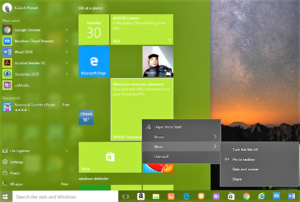
Now let us talk about what we can change in these tiles. Right click the Phone Companion tile. As shown in Figure 2(c) and 2(d), right clicking a tile gives you the following options
- Unpin from Start
- Resize
- More
- Uninstall
Unpin from Start removes the tile from the tiles column without affecting the app itself. However, if you want it back in the Win 10 Start menu tile, right click it in the All apps and choose Pin to Start. You will get the tile back in the tiles column.
Hover your mouse cursor over Resize, you will get the list of sizes you can change your tile to. If you are using touch screen, tap Resize to get the list of sizes. In Figure 2(c), Large is already selected because the size of the tile is Large. However, you can click or tap any one of the Small, Medium and Wide to select a size for your tile.
Now let us see what the More option has to offer. Hover your mouse over More. You get 4 options to act upon.
The More Options In The Start Menu Tiles
- Turn live tile off
- Pin to taskbar
- Rate and review
- Share
The first option is Turn live tile off because the animation is already on in the tile. Click or tap Turn live tile off. The animation will turn off. If you want to turn the animation on again, hover your mouse over More. You will get the options available in Figure 2(d), except Turn live tile off, to act upon. Instead of Turn live tile off you will get Turn live tile on. Click or tap it and the tile will get animation back on.
Pin to taskbar puts an icon for app (Phone Companion in this case) on the taskbar indicating that the app is now pinned to taskbar.
Rate and review, when you click or tap, lets you rate the app on a 0-5 scale and write a review about it. At this point of time we are not concerned with the Rate and review and Share as we are only working on personalization of the Start menu tiles.
The last option in Figure 2(c) is Uninstall. By clicking or tapping it you can completely remove the app, in this case the Phone Companion, from your machine.
Organizing Win 10 Start Menu Tiles
You can organize Windows 10 Start menu Tiles by performing the following actions.
- Deleting apps from the Tiles menu
- Adding apps to the Tiles menu
- Creating and naming the Start menu groups
Deleting Apps From Tiles Menu
You don’t necessarily have to have all of the tiles in Win 10 Start menu as they are. If you desire so, remove them from tiles column one at a time. To do so, right click (or tap and hold) a tile, then click (or tap) Unpin from Start. The tile is removed from Start menu tiles column. You can remove all the tiles. However, Start screen will remain there with no tile in it.
Adding Apps To Tiles Menu
If you want to add tiles to Start menu, you can do so. To add an app to Start menu tiles, click Start icon, then choose All apps, right click or tap the app you want to include in the tiles column and click or tap Pin to Start. The app appears in the tiles column. Do this for any app you want to include in the Tiles menu.
From the above deliberations, it is evident that you can customize your Start menu so that your apps appear on either left side Start menu or right side Tiles menu or taskbar or on any two or on all of them.
Creating And Naming The Start Menu Groups

In Figure 2(b), Life at a glance and windows defender are groups. The partially visible 3rd group at the bottom doesn’t have a name. The Life at a glance group has tile for the apps that I use regularly. These are – Calendar, Mail, Microsoft Edge, Photos, Weather, Phone Companion, Store and Candy Crush Saga.
You can customize this group to include similar apps in it. You can include any apps you want in this group. Also, you can remove any apps you want from this group. Use drag and drop method to do so. You have now personalized your group.
You can create a new group. To do so, click and drag (or tap and drag) a tile all the way to the bottom. As soon as a horizontal bar appears at the bottom, a new group has been formed. Drop the tiles there. You can drag any apps you want from other groups and drop into this group. Also you can pin any apps from left side menu to this group.
Figure 2(e) shows a new group that has amazon app tile. You can add tiles to it. Name group and a hamburger icon appear at the top of the group asking you to give a name to the group. Click or tap on the hamburger icon or to it’s left. A horizontal box will appear. Type a name for this group in the box.
If you want to change the name of a group, click it and type a new name in the box.