Windows 10 is equipped with built-in security measures to help protect your data against known and emerging security threats. These measures include Windows Defender, SmartScreen, UEFI, User Account Control and Windows Firewall.
However, in this post I will explain Windows Defender, one of the very important Windows 10 security features. To learn about other features of Windows 10, click or tap the following links.
- http://pkailash.com/digitaltechnolution/windows-10-features-windows-10-start-menu/
- http://pkailash.com/digitaltechnolution/windows-10-start-menu-personalizing-left/
- http://pkailash.com/digitaltechnolution/win-10-start-menu-personalizing-right/
- http://pkailash.com/digitaltechnolution/windows-10-features-microsoft-edge/
- http://pkailash.com/digitaltechnolution/windows-10-features-microsoft-edge-browser/
Page Contents …
Windows Defender
Windows defender is an antivirus and antispyware program incorporated into Windows 10 operating system. The defender on Windows 10 devices, scans the devices and watches out for malware in real time. It critically examines email attachments, catches downloads and scans them. Subsequently, it reports you about any viruses or malware it discovers. You have the option to delete or quarantine the detected viruses or malware.

The Windows defender is turned on by default. So, when you buy your new Windows 10 device, you don’t have to do anything to turn it on. However, it may happen that you or somebody else using your PC turns the defender off accidently. To be sure that the Windows protection is on on your device, you need to enter into the defender settings and check if it is on. If it is turned off accidently or maliciously, just turn it on.
How To Access Windows Defender Settings?
The following paragraphs explain how to access Windows Defender and it’s Settings from the taskbar of your Windows 10 PC.
- On the right of Start icon, in the Ask me anything Search box of Cortana, type Windows Defender or Defender. Since these are search terms that you are typing in the Search box, you may type them informally without caring for using upper case or lower case. This pops up a small window, or pane, listing a number of items. You can choose any one item from the list by clicking or tapping it. One item in the list is Windows Defender under the Best Match heading. Also, the pane displays Windows Defender settings in the Settings. Click or tap Windows Defender to open defender window.
- Click or tap Start icon in the lower left corner of the desktop. Then click or tap the Settings. A gear symbol represents Settings as you can see in Figure 1. Subsequently, a Settings window opens. In this window, click or tap Update & Security. Then, another window, the UPDATE & SECURITY opens in Settings window. To open the window that contains the settings you may want to change, click or tap Windows Defender. These settings are Real-time protection, Cloud-based protection and Automatic sample protection. Other than setting these protections, you can exclude the files that you don’t want defender to scan. To do that, click or tap Add an exclusion in Exclusions.
Another route to access the defender settings is through the Control Panel. Now, let us access the defender settings through the Control Panel as below.
Accessing Settings Through Control Panel
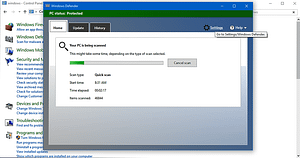
Right click or tap and hold the Start icon. Then, click or tap Control Panel in the list that pops up. On the top right corner, in the Search Control Panel search box, type Windows Defender or Defender and press enter. You can be informal in using upper case or lower case while typing these search terms. That displays a list of Control Panel items. In this list, Click or tap Windows Defender. In the window that opens, click or tap Settings to open Windows Defender Settings window.

Windows Defender And A Third Party Anti-Virus Can’t Work Together
While using the built in Windows 10 security features, you should take certain precautions.
The Windows defender, a built in security in Windows 10, interacts with a third party antivirus installed on your device. So, never run a third party antivirus program if you are running defender. If you run a third party program, then it disables the defender on your PC. Don’t try to enable it. At a time, only one of the two programs can work. To bring it back to working, it is necessary that you uninstall the third party antivirus program from your PC and then restart it. Windows Defender returns and is ready to protect your machine. Check if the virus and spyware definitions or up to date or not. If not, update them. They are set to update automatically. However, you can click or tap Update to get the latest versions whenever you want. After clicking or tapping Update, you need to click or tap Update definitions.
How Defender Affects Privacy?
Real time protection offered by Windows Defender may prove to be a real threat to your privacy. Visualize a situation in which Windows defender encounters a suspicious file and it can’t resolve the security issues associated with it. This may happen if it doesn’t have the latest definitions. Under such circumstances, it sends those files to Microsoft server for further analysis at their end. As a result your privacy is exposed to Microsoft. Of course, windows seeks your permission to send your files or applications to Microsoft sever before sending it to Microsoft. The choice now is yours – Real time protection or privacy of your data. If you choose to disallow encroachment into your privacy, you would have to opt out of real time protection. However, if you do so, you won’t have latest virus definitions. If you don’t have latest virus definitions, your data security is at jeopardy.
Configuring Defender Settings
Windows Defender is set to run automatically by default on your Windows 10 machine. Once out of box, the defender on your machine doesn’t have to be set or adjusted normally. However, can do some small adjustments in it’s settings. Let me you how to navigate through these settings.
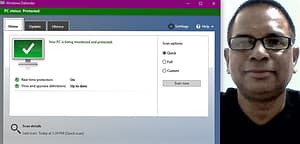
- Type Windows Defender or just Defender in the Search bar or Ask me anything search box of Cortana on the right side of the windows Start icon on the left of taskbar. Then click or tap enter. I did so and the Windows Defender window you see in Figure 1 appeared on the screen. I have mentioned it in para 1 above as well. Alternatively, you can follow para 3 to get defender on your screen.
- On the upper right corner to the left of Help in Figure 1, click or tap Settings to get a Settings pane as you see in Figure 2 below. I have mentioned the Settings that you can change at Step 2 in “How To Access

Windows Defender And It’s Settings” that you can change in Figure 3 above. You can scroll down and see Add an exclusion in Exclusions. Go through the privacy statement to learn what personal data Microsoft collects from you if you turn on the protections.
I have mentioned above the minor changes that you can bring in in the defender on your machine.
How To Run Windows Defender Manually?
Normally you don’t need to run Windows Defender manually. It is set to run automatically and there is no way to get out of it. However, you can run it manually to scan your computer anytime you suspect that something went wrong with the security on your computer.
Follow these steps to start a manual scan of your Windows 10 machine.
- Open the defender window. To do so follow para 1 of “How To Access Windows Defender Settings” above. Also, you can access defender through the Control Panel. I have explained that in “Accessing Windows Defender Settings Through Control Panel” above. Acting as per these procedures results in the display of defender window on the screen as in Figure 1 above
- Click or tap Update on the right side of Home and then click or tap Update definitions button as you see in Figure 4 below

I clicked Update and then Update definitions. As a result, the Windows Defender retrieved the latest malware definitions from the Microsoft server. The above picture shows the status of Virus and spyware definitions which is Up to date.
- To run a scan, click or tap Home. You will get back to defender window of Figure 1. As you see in this figure, there are 3 scan options – Quick, Full and Custom.
Here is a brief introduction of Scan options
–Quick option scans the locations it suspects the malware could be hiding in
–Full option scans every file and folder on your machine up to the bit level
–Custom option runs the full scan of your chosen drives and folders
- Click or tap the radio button on left of the scan option you want to run and then click or tap Scan now
- Once the defender finishes the scan, you can click or tap History button on the right of Update button in Figure 1 to know the result of scan you just run
Figure 5 below shows the history of actions that Windows Defender took on my PC.

- While scanning your PC, if defender detects a malicious file, it asks you what action you want to take on that file. You can choose to quarantine it. Defender prevents the quarantined items from running. However, it doesn’t remove them from your PC. You also have the choice to allow the program to run on your PC. If you allow the programs or items, they run on your PC
- In History, you can select one of these 3 items at a time- 1. Quarantined items, 2. Allowed items and 3. All detected items. After selecting the item click or tap View details button that you see in Figure 5 above. That would display the detailed list of that item.
What Actions You Can Take On Windows Defender Findings?
- Look at the statement above the View details button in Figure 5 above. It says, “To help protect user privacy, these items are hidden. Click View details to see the items.”

- There are no items in the quarantined items list. However, if you ever have the items in this list, you would have the information about those items – Detected item, Alert level and Date. If you look at the bottom right corner, you have the option of actions you can take on those quarantined items – Remove all, Remove and Restore.
- To take actions on Allowed items and All detected items, select them one at a time. Then click or tap View details button and take the action available for that item – Remove all and Remove for each of them at the bottom right corner as you see in Figure 6.
If you recently purchased a new Windows device, Windows 10 or Windows 11 running on it, you may be wondering if you should install a third party software to protect it from malware and other type of viruses.
It is a good news for you that Windows Defender is enough to protect your device from any of the malware and virus threats. In fact, it will stop working if you install a third party antivirus software on your device. Only one of the third party antivirus and the Windows Defender will work at a time.
