Page Contents ...
User Account Control: An Introduction
The User Account Control, or UAC in short, comes in picture whenever you or a program you are running attempts to perform a system administrator task. The UAC asks for a user consent before commencing the task or action. It does so to alert you that this action could be harmful to your Windows 10 device. The UAC is a very important security measure in Windows 10.
The paragraphs below introduce you to the terms User Accounts and the Privileges that these accounts have on using the computer resources.
The first user account you create while setting up your Windows 10 PC is Administrator user account. This is the default account. Subsequently, you create other accounts. These are the Standard user accounts. The Administrator user accounts have administrator user privileges and can make system level changes. However, the Standard user accounts have the standard user privileges and can use the PC for the day to day tasks but can not make system level changes on the PC.
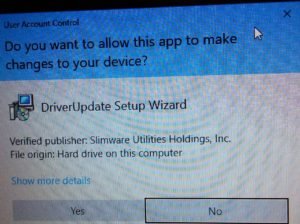
One thing to remember here is that whenever you – either the Administrator user or the Standard user – or the program you run attempts to make system level changes, the UAC displays a User Account Control prompt. If you sign in as an Admin user, the UAC displays a consent prompt. Here you need to pause for a while and read the contents of the UAC consent prompt dialog box as in Figure 1 above. You need to verify the name and publisher of the program.
To know more about the program you are attempting to run, you can click or tap the Show more details and read the full information about the program. Once you are satisfied that the program you are attempting to run is safe, you can go ahead and click or tap Yes to run it.
Since I signed in as an Admin user on my Windows 10 PC and attempted to download DriverUpdate Setup Wizard, the UAC displayed a consent prompt, not a credentials prompt as in Figure 1 above. If a user signs in as a Standard user and performs the same action as I did, the UAC would display a credentials prompt.
However, if you sign in as a Standard user, the UAC displays a credentials prompt. Now you need to provide the credentials of an Admin user. Subsequently, the application or program would open as if an Admin user has launched it.
How To Change User Account Control Settings In Windows 10
Accessing The Settings Window
To change the User Account Control Settings, you need to get to the UAC settings window as in Figure 2. There are 2 ways for you to access it. Just follow one of those. They are as follows.
- In the Cortana search box, click or tap and type uac or user account control. A window pane pops up. Now click or tap User Account Control settings option from the pop up window. The User Account Control Settings window opens
- Click or tap Start icon, the new Windows logo. Then click or tap Control Panel in the menu list that pops up. That will open the Control Panel window. In the Search Control Panel Box, type uac or user account control and click or tap search icon on the right. That will open the User Account Control Settings window
If you have not changed the default UAC settings and sign in as Admin user, the UAC settings window like one you see in Figure 2 opens. It is worth mentioning here that you can’t change the UAC settings if you sign in to windows with a Standard user credentials. In fact, a standard user can’t access the UAC settings window. However, the default UAC setting for a Standard user is the one you see in Figure 3.
Setting Up A Notification Level In User Account Control Settings Window
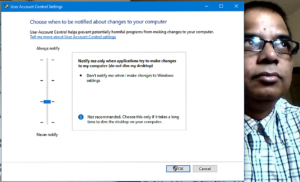
You now have the UAC settings window on your screen as in Figure 2 below. This window shows the default UAC setting. It’s at Level 2 from top. If you want to change the notification level, you have 4 options to choose from. Move the slider on the vertical bar to any of these 4 levels. You will be setting the slider at one of the 4 Levels – Always notify at the top and Never notify at the bottom and 2 levels between them. By setting the slider at one of these levels you Choose when to be notified about changes to your computer.
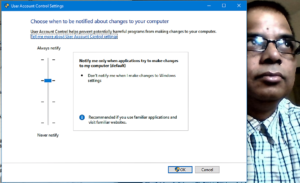
In Figure 2 above, the slider is set to Level 2. This is the default setting for an Admin user. This is the best choice as it is set not to notify when an Admin user makes changes to Windows settings. With this setting the user, Admin user, gets the least annoyance from the popping up prompts. It brings up the UAC notification only when a program tries to make changes to computer. Also, it doesn’t bring up notification when the user makes changes directly.
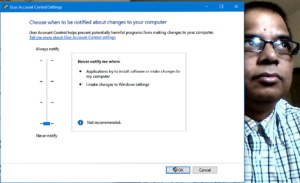
Figure 3 below shows the default user account setting for a Standard user account. When set at this level, the UAC
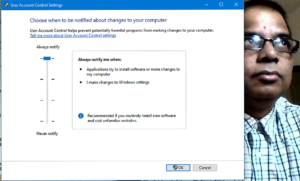
provides the highest security. However, it also offers the most hurdle. The reason for this is that it always brings up the full UAC notification whenever
- A program tries to install software or make changes to the computer that require elevation to Admin user
- You, the Standard user, try to make changes to Windows settings that require elevation to an admin account
The User Account Control displays notifications even if you sign in as an Admin user. You can’t proceed further until you reply to the UAC prompt. Only after you reply to consent prompt in the User Account dialog box, the greyed and locked desktop returns to normal.
Microsoft Doesn’t Recommend To Set User Account Control Setting At Level 3
Now let us look at how the UAC prevents you from performing an unsafe action on your Windows 10 PC when the slider is set to Level 3 as in Figure 4 below.
In fact there is no much difference between UAC set at Level 2 and Level 3. UAC when set at Level 3 provides the same safeguards as it provides when it is set at Level 2. However, there is one significant difference between the two. Although the UAC displays notifications, the desktop doesn’t turn grey and, thus, it doesn’t lock when the slider is set at Level 3. That means the desktop is open for action. That action could be from a malware. Level 3, thus, doesn’t provide safeguards against malware.
Microsoft Doesn’t Recommend The Notification Setting At Level 4
Setting the slider of UAC settings at Level 4 is not recommended as it turns off all User Account Control notifications. The setting at Level 4 disables the UAC. Thus, with notification set at Level 4, the programs can install other programs and make changes to Windows settings. However, this setting doesn’t override other security settings.
So, if you sign in as a Standard user, you need to provide an Admin credentials before you can install a program that would run for all other users.
Since, you have got a general understanding of the User Account Control, it will now be easier for you to learn how the UAC works as an important security feature on your Windows 10 device.
User Account Control Is An Important Security Feature On Windows 10