Starting with Windows 8, every windows machine requires to run UEFI, the Unified Extensible Firmware Interface. This was the licensing requirement binding on manufacturers who used Microsoft’s Windows 8 Operating System on the machines they manufactured. Having UEFI on Windows 10 is part of licensing requirement for Windows 10, the post Windows 8 version, too. That is why UEFI is a built in security measure on all Windows 10 machines. It controls the boot process of Windows 10 powered machines.
UEFI is a firmware trusted by the manufacturers of Windows 10 devices. If enabled, it allows your OS to boot. But it would not let some PC graphics cards, hardware and any other OS to run. UEFI operates in one of the following two modes.
- UEFI Mode and
- BIOS Compatibility Mode
Windows 10 systems that shipped with the new Windows 10 Logo have the UEFI configured in the UEFI mode. You may think why I am mentioning the new Windows 10 Logo here? It only implies that these were the new machines shipped with Windows 10 OS and they never had any OS older than Windows 8/8.1 installed on them before. The Windows 10 systems, if they don’t have new Windows Logo, are the upgraded system that had Windows older than Windows 8 when they were shipped as new machines. These machines have BIOS on their mother boards. That is why, after upgrading to Windows 10, they have UEFI configured in BIOS Compatibility Mode.
Page Contents …
UEFI Uses Secure Boot To Launch Windows 10
Secure boot is a feature that prevents the malicious software and unauthorised media from loading during the boot process. This feature is enabled by default. However, you can decide to disable it if you really want to by changing settings in the UEFI.
Secure boot on Windows 10 ensures that your Windows 10 PC or device will only boot Windows 10 OS on it. The reason for this is that this is the only OS the manufacturer has trusted on this PC or device. This security feature of UEFI ensures that no other OS, the Linux or Windows 7 and prior

versions of Windows, boots or installs on this machine. It also ensures that some PC graphic cards and other hardware do not run on your PC. Thus, it ensures the integrity of your device. Secure boot is enabled by default on Windows 10 PCs at the time they are shipped.
The secure boot on Windows 10 devices validates the program that attempt to run on your machine. It won’t allow them to run if they don’t have digital signature. That is why if you want to dual boot Windows 10 and another Operating system, the other operating system must have Microsoft approved digital signature. This was not a requirement before UEFI secure boot came into being.ow To Disable Secure Boot?
What if you want to install and boot an OS other than Windows 10 on your Windows 10 PC? In fact, Secure boot would not let you install it. Then how would you go ahead with installing or booting it? You can do that by disabling the secure boot feature of UEFI. Of course, you won’t now have the security that secure boot provided. However, you can now boot any operating system you like.
Warning Against Disabling Secure Boot
Although you can disable secure boot in most PCs by changing their firmware settings, Microsoft warns against it. The warning aims at making it sure that you don’t do so until and unless you really need to do it. Once you disable the secure boot, it may not be possible for you to re-activate it without restoring your PC to the state it was set at factory.
How To Disable Secure Boot?
After giving your consideration to the above warning, if you still decide to disable the secure boot, follow these steps.
- Launch your Windows 10 device
- Click or tap Windows Logo, the Start icon, on the bottom left corner of the screen. It’s on the left side of Cortana search box as in Figure 1 above
- In the pane that pops up. click or tap Settings. A gear symbol represents it as in Figure 1 above
- In the Settings window that opens, click or tap Update & security as in Figure 2 below

- Click or tap Recovery on the left side, in the UPDATE & SECURITY menu as in Figure 3 below

- Now, in the Advance start-up, as you see in Figure 3 above, click or tap Restart now button
- The PC reboots now and takes you to Choose an option screen as in Figure 4 below. This screen offers you four options you can choose the one from. Now click or tap Troubleshoot

- You would land at Troubleshoot screen. Here you have two options from which you can choose one
- From the two options available to you, click or tap Advanced options as in Figure 5 below. You would get to Advanced options screen

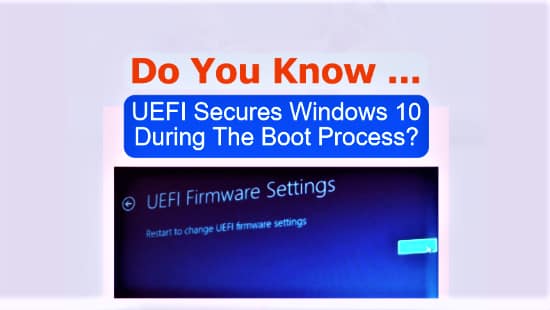
- The Advanced options screen, as in Figure 6 below, has six options to choose one from. Click or tap UEFI Firmware Settings. Doing so will take you to UEFI Firmware Settings screen

- On the screen in Figure 7 below, you have two options. You can either go back to Advanced options screen of Figure 6, by pressing or tapping the back button, to select a different setting or you can go ahead and click or tap Restart button. Doing so will take you to UEFI Setup Utility screen

- Look at the screen in Figure 8 to find out the Secure Boot setting. This may be available either in Security or Boot option.
However, on my acer PC I found it in Boot option. I tried to get into the Boot Mode setting and attempt to change the boot mode. But I could not get into it and, thus, I didn’t change it.
- If possible, change or set Secure Boot to Disabled.
- Save the changes you made and exit

You have successfully disabled Secure Boot on your Windows 10 PC. You can now install any graphic card, hardware or the Operating System that you were not able to install before. These are now compatible with your OS as you disabled the Secure Boot.